|
"Here's A Quick And Easy Way To Add
Powerful Popups To Your WordPress Blogs, Building
Your Mailing List On Autopilot"
|
Dear Friend
Popups are now a well-proven technology
for building a list.
They can be particularly effective when
used on a blog, allowing the blog owner to turn ordinary
visitors into highly profitable subscribers.
WP Popup Pro is our brand new
software for adding popups to WordPress blogs, using standard
WordPress plugin technology.
The software is quick and easy to set
up, offers a HUGE range of features and costs far less
than other premium WordPress popup solutions...
 Easily Create A Popup To
Promote Any Offer Easily Create A Popup To
Promote Any Offer
Popups are
just ordinary HTML web pages (except that it is
smaller than a normal page).
This means that you can design just
about any layout for your popup, using any HTML editor. Full
instructions are included with the software.
But to make it really easy, the software
comes with a special tool that creates popups automatically,
just by filling in a form.
Here's a screenshot of the
tool:
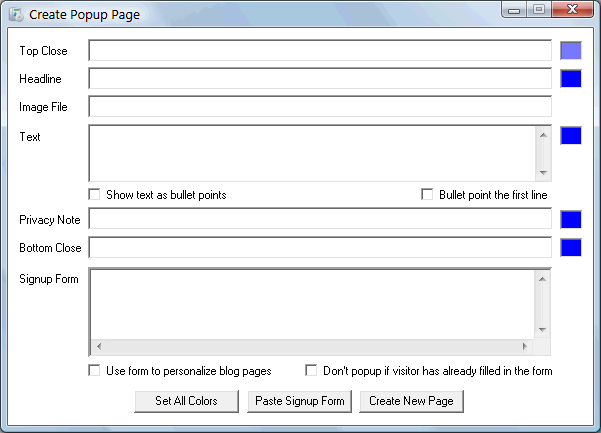
Just type the text you want to appear into the various
boxes (full instructions are included).
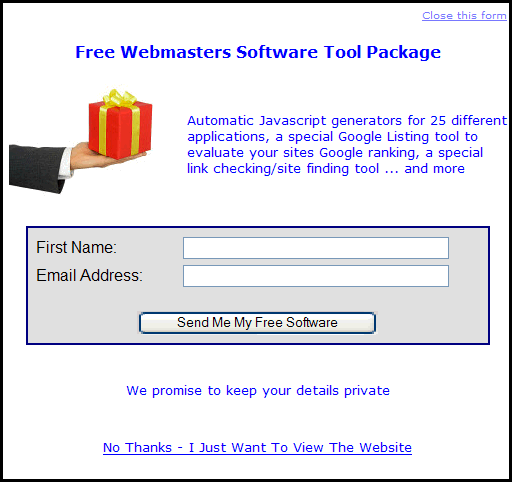
I've included an example page created
using the software below so you can see what each box relates
to:
You can select the text and
color for each item - the close message at the top right,
the popup headline, the main popup text (which can optionally
be in the form of a set of bullet points), the privacy
guarantee and the close window message at the
bottom.
After filling in the boxes, you simply
paste a signup form from your autoresponder into the
software, then click the Create button. Your
signup form page will be instantly created.
With this simple tool, you can create
professional-looking popups that effectively promote your
offer - all in two minutes flat!
Easily
Create Your WordPress
Plugin
Once you have created your popup page,
you can add use the special tool
shown below to create your WordPress plugin:
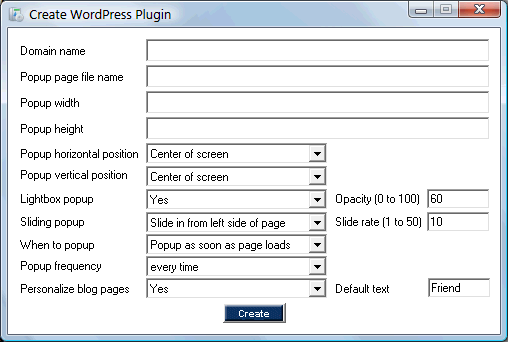
You enter the file name and size of
your popup page and select the desired settings for the type
of popup you want.
Click the Create button
and the tool will instantly create the plugin.
Upload the plugin to your blog
along with the popup page and your
popup will then appear on all the pages of your blog
automatically.
Easily Add Any Type Of Popup
To Your Blog
Using Multiple
Styles At Once
For simplicity, I've described these as
three separate styles.
In practice however, you can use any
combination of these styles together.
For example, you can use a sliding popup
in conjunction with the lightbox effect.
This allows you to easily create any
sort of popup you want.
Fully Control All
Aspects Of Your Popups
For all the different types of popups, you have
complete control of how the popup behaves.
When using the lightbox feature, there is an "opacity"
setting, which allows you to determine how much the
underlying web page is grayed out when the popup is shown. A
typical value of 60% grays the underlying page by
60% so it is still visible but less noticeable than the
popup. You can use any value between 0% and 100%.
When using the slide-in feature, you can choose whether the
popup slides in from the left, right, top or bottom of the
screen. You can also control the speed of sliding.
You can choose the final position of the popup. This is
normally the center, left side or right side of the
screen. However you can put the popup anywhere you want,
even specifying the exact pixel position if you wish.
There is a "frequency" setting,
which allows you to choose how often the popup will
appear. This can be set to every time the page is
viewed, once for each browser session, once a day, once a
week, once a month or just one time.
All these options allow you to get your popups working
exactly the way you want.
Popup On Entry, On
Exit, Or Using A Delay
Your popup can popup on entry (i.e. as
soon as the blog page loads), on exit (i.e. when someone
attempts to leave your blog by moving their mouse away from
the page) or after a specified delay (i.e. a specific
number of seconds after the page loads).
These options give you complete flexibility and control
over when your popups appear.
Personalize Your Blog To Increase
Response
Almost all marketers now personalize their emails when
sending them to their list.
This simple technique has been proven to boost response to
email offers.
Now with WP Popup Pro, you can take this concept
to the next level, by personalizing your blog as
well.
Whenever a visitor enters his or her name into your popup,
the name is stored automatically (it is stored on
the visitor's own PCs in something referred to as a
"cookie").
If you insert the text
"%%name%%" anywhere in your blog
posts/pages, that text will be replaced automatically
with the visitor's name.
You can also specify default
text, which will be used for visitors whose name is not
stored.
This simple solution can increase your
response rates by making your blog more personal for your
subscribers.
 Special Theme
And Plugin Installer Tools
Included Special Theme
And Plugin Installer Tools
Included
The
software comes with our special Theme And Plugin
Installer Tools.
These offer an easy way to install themes (to change the
look and feel of your blogs) and plugins (to add features to
your blogs).
Although WordPress includes features to install themes and
plugins from within the blog admin system, these features do
not work on many web hosts.
Our Theme and Plugin Installer Tools offer a simple
alternative.
Here's a screenshot of the Theme Installer Tool (the Plugin
Installer looks identical).
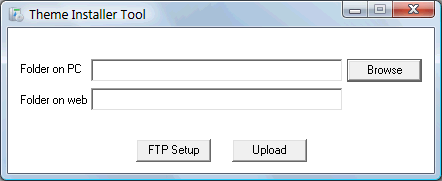
To use the Installer Tool, just put the theme (or
plugin) files into a folder on your PC and then use the Browse
button to select that folder.
If your blog is set up in a folder on your website, enter
the name of the folder into the second box (otherwise leave
the box blank).
Click the FTP Setup button and enter your website domain
name along with your web hosting user name and password. These
details are remembered for future use.
Click the Upload button and everything (files and any
subfolders) will be uploaded automatically to the correct
place on your blog automatically.
Use On All Your Blogs At No
Extra Cost
The software is
licensed for use on an unlimited number of blogs, so
you can use it on every blog you own, without paying any
extra.
Harness The Power Of Blog Popups
Now

I hope you can see the HUGE
potential of using WP Popup Pro in your
business.
It is quick and easy to set up and offers a powerful
and effective solution for building your own mailing
lists.
With all these benefits, you might expect to pay a lot for
this software.
However, if you order right now, you can get your own copy
for just $9.95.
Your order is covered by our cast
iron 30-day, no risk, 100% money-back
guarantee...
Your 100%, No Risk, No Questions
Asked,
Money-Back Guarantee
If you
still have any lingering doubts about purchasing, let me
reassure you now with the knowledge that your copy of
this superb package is covered by my 100% cast iron,
no questions asked, no risk guarantee.
If at
any time during the next 30 days, you
decide that this package does not meet your
requirements, just shoot me a quick email and I
guarantee to refund your money in full, no
questions asked.
All this means you can take a
full 30 days to check out all this great software
for yourself, with no risk whatsoever.
In
other words...you have everything to gain and
nothing to lose!
|
Please Order Now For
Just $9.95
You'll
receive instant access to your package, even if it's 2
o'clock in the morning.
Totally secure payment is
through Paypal

Requirements: Blogs must
be WordPress blogs on your own web hosting (i.e. NOT on
wordpress.com). Ideally you should be using the latest version
of Wordpress, but the plugin should work with any version of
WordPress from 2.6 onwards. The tool that creates the plugin
requires a PC running Microsoft Windows (any
version).
Support For
WordPress Multisite: WordPress Multisite is and
advanced WordPress feature that allows a single installation
of WordPress to operate multiple blogs. This software supports
Multisite as long as each blog is on a
different domain or subdomain (which is the normal use of
Multisite).
Earnings
Disclaimer: Although we provide powerful tools
which can help build opt-in lists, the results are
dependent on many factors outside our control,
including the quality and nature of the traffic received
by your blog and the value of your subscription offer. We are
not therefore able to give any guarantees about the number of
subscribers or level of income that you will attain by using
this software. We will however happily refund your money in
full in the unlikely event that you are unhappy with your
purchase.
| 